Is it possible to upgrade Motherboard and CPU without reinstalling Windows? Many Windows users who are going to upgrade their computer are seeking the answer. Basically, it is possible to do. We are able to upgrade motherboard and CPU without doing fresh install on Windows. Hence, keep on reading as we will discuss the method in this post.

Contents
How to Upgrade Motherboard and CPU without Reinstalling Windows
Here, we will show you the easiest way to upgrade motherboard and CPU without reinstalling Windows in several steps. Therefore, we will need a help of third part software like MiniTool Shadow Maker. This small tool will help us on creating a bootable media that we will need and helping us to restore the Windows image after upgrade.
However, the first thing you should is backup the data in your computer. So, when something goes wrong, all your important data are safe.
Read on the detailed instructions below on how to upgrade Motherboard and CPU without reinstalling Windows:
Step 1: Create a bootable media
- Get the MiniTool Shadow Maker from here and install it on your computer.
- Launch MiniTool ShadowMaker Trial Edition, choose Keep Trial and local backup.
- Go to the Tools tab and select Media Builder.

- Hit the WinPE-based media with MiniTool plug-in section.
- Select media destination, which can be ISO file, USB hard drive, USB flash drive, and CD/DVD disc. Then, start the creation.

Now, you will have a system backup on a recovery drive.
There is another method to create a bootable image. Check on Tutorial to Create Bootable USB from ISO Windows 10 article.
Step 2: Upgrade Computer
After you have backed up the data and created a bootable media, it’s time to upgrade your computer.
Do not forget to clean your CPU while installing a new motherboard in it as many CPU are usually quite dirty because it’s not clean regularly. Check that you plug the device in the right socket, like the RAM and Graphics cards. Ensure that they are plugged properly in the motherboard too.
The next thing you should pay attention is the cable. Check all the cables and make sure that each cable goes to the right device. Once you have finished installing the new motherboard and everything in the CPU, you are safe to go to the last step.
Step 3: Restore Windows OS
- Go to BIOS and change the boot order to boot Windows using the bootable media you have created earlier.
- The MiniTool Shadow Maker will launch. Select the Universal Restore under the Tools section.
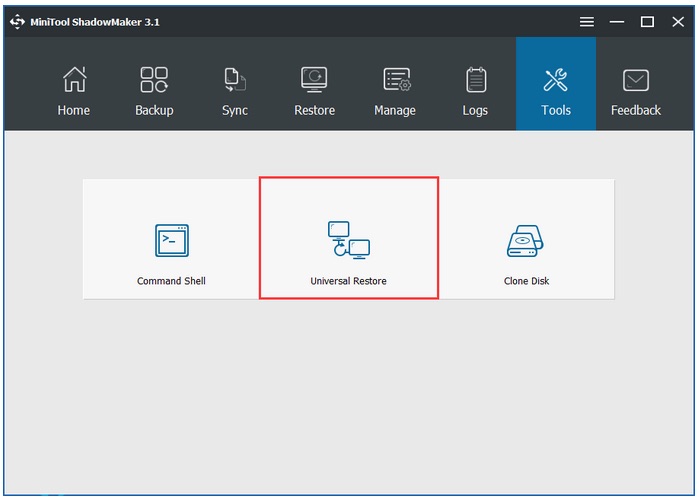
- It will detects the operating system installed in the hard drive. Choose Windows 7 and hit on Restore to repair the unbootable OS after upgrading the motherboard.

READ ALSO: Easy Tutorial to Create Ghost Image of Windows 10/8/7
Conclusions
Now, you have successfully upgraded motherboard and CPU without reinstall Windows. The new computer will have no different with the previous one, but the performances. You can share this method to your friends who want to upgrade their computer without fresh install.
If you happen to have any questions and suggestions, feel free to contact us. Thank you for reading, Folks!